I’m not quite done writing it out in a shareable manner, but my friend and I have drafted up a campaign system for Battletech: Alpha strike and thought I’d take the time to go through my major decision points and the general idea behind what we’ve created.
I’ll start by being blunt: we’re stealing a lot here! First off, I’ve read the Battletech Campaign Operations book and I’m taking the general concepts of Warchest Points and Supply Points. Warchest Points are effectively “Action Points” spent to execute campaign level actions. Supply Points are a representation of spare parts, fuel, or anything needed to maintain your force’s physical condition.
Secondly, we’ve watched the truly great YouTube series produced by Wargamer Stories on YouTube:
https://youtu.be/SXz14RWhYzM?si=U2kKVOyjbIlEDFqf
I recommend this series heartily: the production values are good and the campaign system is compelling, if a bit more complex than I want.
Lastly, I’m usually inspired by TooFatLardies to some degree, though I can’t tell you exactly how-so here. Just know that some of this probably comes from my interaction with their campaign systems.
Introduction: The System Goals
Similar to any great wargame, I think a great campaign should have a central set of objectives it wishes to achieve. Mine are as follows:
1. Include logistics in a streamlined, approachable manner than affects player decision making
2. Separate logistics, maintenance, and will to fight into distinct, important categories
3. Keep the campaign to 10-15 games average
I came to these objectives by boiling down operational level decision making to constituent parts and stripping away anything I’d identify as “Fiddly.” I want logistics to constrain your decision making, but casualty management to me gets to be a step too far for a hobbyist campaign. Let’s breakdown how the map works, followed by how each campaign element works.
The Campaign Map
Here’s an example of part of our map:
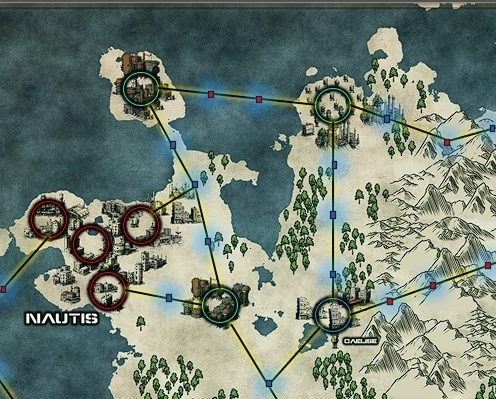
You can see here the various nodes connected by spokes with intermediate nodes on them. The large circles are color coded: red is cities, blue is towns, and green is logistics nodes. The small rectangles in between represent transit nodes, which consume movement points—blue consumes one point and red consumes two.
Cities are the victory conditions for the game and affect your will to fight—losing or capturing cities knocks you up or down a level. Cities and Towns are points of supply: an army must be within ten nodes of a city or town (or a constructed forward base) to be considered “In Supply.” Logistics nodes provide no supply as they represent raw materials, not end-product factories. You need them to generate the Warchest Points that fund your campaign level actions.
Transit nodes exist solely to consume unit movement so you can’t just zip around the map and constantly attack your enemy’s backside.
Logistics & Maintenance – Warchest Points and Supply Points
Warchest Points, as mentioned earlier, are the points spent to take campaign level actions. Want to move an Army Task Group? 100 points. Want to assault an enemy position? 150 points. Want to build a Forward Operating Base to help move supply forward? 300 points.
Warchest Points are generated by holding Logistics Nodes, with each node generating points each turn. Holding more nodes may not be your win condition, but it fuels your war machine to achieve the win condition (capturing cities).
Supply Points are spent to repair damaged mechs, tanks, VTOLs, infantry, etc. To keep it simple, you only have to “repair” something if it takes Structural Damage. Battletech divides damage into Armor (exterior) and Structure (interior). We assume you can replace armor panels quickly and easily, but repairing real damage takes Supply Points.
You earn Supply Points by spending Warchest Points to buy them once per turn. On scale, I’d expect the average battle recover to cost around 200-250 Supply Points—which is a lot. To keep things repaired and ready to go, you have to have Supply Points set aside. This is meant to be an abstraction of Push and Pull logistics made rather simple and easy. You have to commit your Warchest Points ahead of time if you really want to keep things moving, which sacrifices some action today. Again, I’m trying to restrict your decision space based on your logistics, and these two points systems come together to do this.
Game Length and Will to Fight
Will to Fight is a morale clock, plain and simple. You start with 10 points of Will to Fight on a 15 point scale and when you hit zero, you lose. Lose a battle? That’s a Will to Fight loss. Lose miserably? That’s a worse loss. Lose a leader? Oh, you bet that’s a loss.
Win a city? That’s a Will to Fight gain! Win a battle by a large margin? Also a gain! Win a battle you definitely should have lost? Definitely a gain!
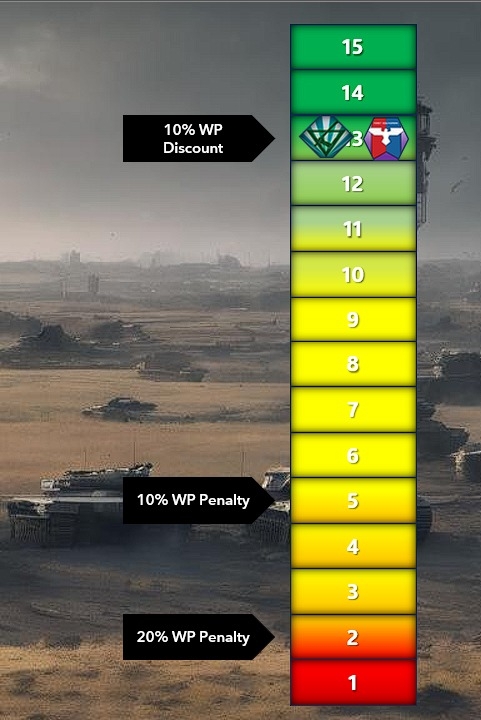
The idea here is if the campaign grinds into attrition, one side will still break first. This Will to Fight mechanic helps to keep the campaign shorter. If you want an even shorter campaign, you could reduce the starting values. Starting at 10 should shape into a 10-15 game long campaign—so if it becomes a grinding back and forth one side’s nation-state or larger actor will likely pull them out. It’s not the most satisfying conclusion, I admit, but it’s fairly realistic. Sometimes wars end not because loss is inevitable, but because the people pulling at your purse strings decide it isn’t worth it anymore.
All Together Now
Putting this all together, we should have a fairly simple campaign to track. There’s roster maintenance, but it’s intentionally minimal (Alive, Damaged, Dead are the three states). There’s logistics abstracted into a simple points system. You can make the decision to get around an opponent and attack their line of supply, or you can prioritize capturing logistics nodes so as to out-generate your opponent and win via sheer overwhelming action and momentum.
Of course, that’s assuming your opponent lets you.
I have no idea if I’ve gone too far or not far enough. The intent is to play out this campaign with a friend and then release it as a free system for anyone to use. We’ll see how it goes! This post covers the core conceits of the system, but there’s obviously a bit more. Movement is restricted by who your slowest unit is in your Task Group, defenses can be built (to a very limited degree), and we will consider adding mechanics for dropships and the like in the future.
One thing to contrast this against the system I linked above on YouTube is that my system doesn’t require a GM. This restricts what is possible: for example, you have perfect overview of your opponent’s forces. I believe GM’d systems are better, but it’s hard enough to get two people playing a campaign, let alone two people playing with a third adjudicating.
Ideally, we’ve crafted a system that runs smoothly and easily while enabling all the difficult decisions that get made in a war that aren’t “Who do I shoot at with my big laser cannons?”
After all, we all know the fun of big stompy mechs is the logistics problems that trail behind them, right? Right?

Leave a comment